Why Can’t I See Azure Easy Auth Headers in the Browser?

Recently, I had yet another opportunity to implement Easy Auth, this time not on a static page but on an app service hosting a React application with a .NET backend. I’m sharing how applicable this mechanism is, especially in SPA applications that do not require a robust authentication scheme (it is also a brilliant choice for migrating apps from on-premises AD identity management to Azure Entra identity management).

The Mystery of Missing Headers: Backend-Only Security by Design

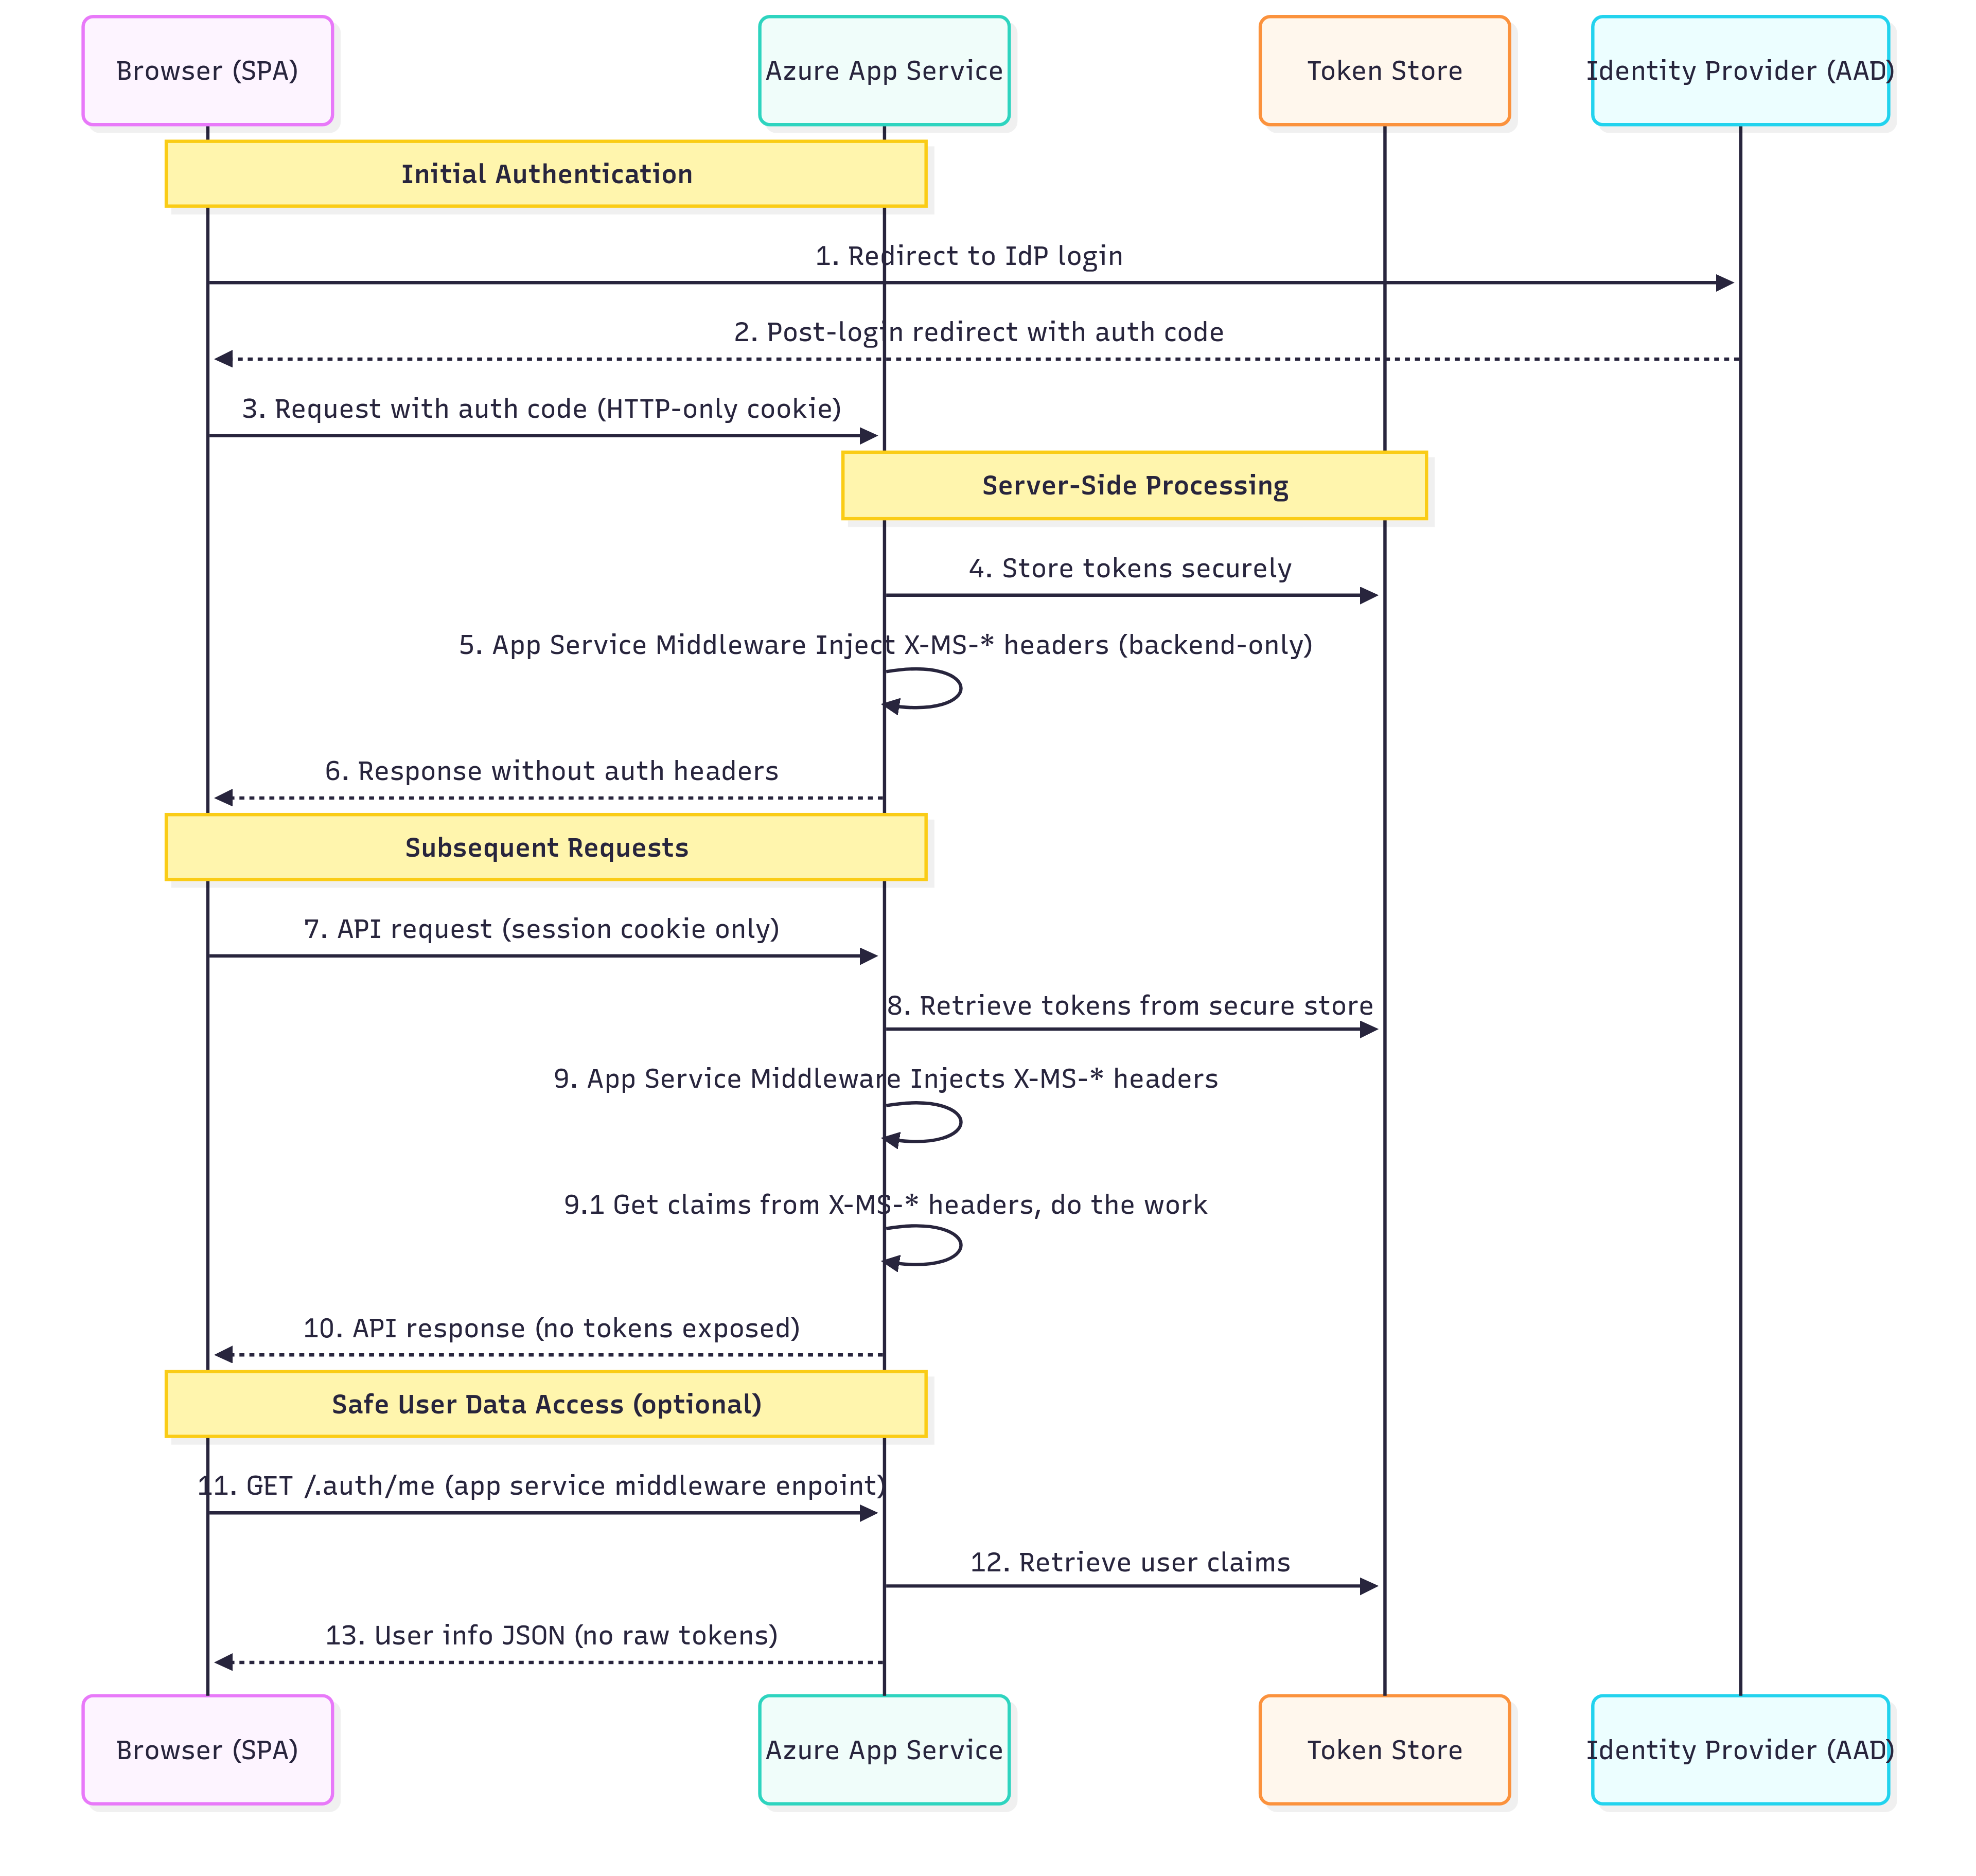
One of the typical questions developers ask when implementing Azure Easy Auth is: “Why can’t I see the authentication headers in my browser’s developer tools?” The answer reveals the fundamental security principle behind Easy Auth’s architecture.

Azure App Service Easy Auth operates on a security-through-isolation model, where authentication headers are injected exclusively into backend requests. These headers never reach the browser, creating an impenetrable barrier against client-side token theft.

This architectural decision addresses a critical vulnerability in traditional SPA authentication: token exposure to client-side JavaScript. When tokens are stored in localStorage, sessionStorage, or accessible cookies, they become prime targets for Cross-Site Scripting (XSS) attacks. Easy Auth eliminates this attack vector entirely by ensuring tokens never enter the browser’s execution context.


Azure Easy Auth Common Headers – What’s Actually There

X-MS-CLIENT-PRINCIPAL

Base64-encoded JSON with all user claims (identity details, roles, groups). Available only for authenticated requests.

X-MS-CLIENT-PRINCIPAL-ID

Unique user ID from the identity provider (e.g., Entra ID Object ID).

X-MS-CLIENT-PRINCIPAL-NAME

Human-readable username, often an email or UPN. Depends on the identity provider.

X-MS-CLIENT-PRINCIPAL-IDP

Identity provider name (e.g., “aad” for Microsoft Entra ID, “facebook”, etc.).

X-MS-TOKEN-AAD-ACCESS-TOKEN

OAuth access token for Microsoft Entra ID, usable for API calls (e.g., Microsoft Graph).
Available only if token acquisition is configured in Easy Auth.

X-MS-TOKEN-AAD-ID-TOKEN

ID token containing user identity details.
Additionally, it requires correct Easy Auth configuration, which is specific to the identity context, not for API calls.

The Token Store, a Zero-Code Token Management

Azure Easy Auth includes a built-in Token Store that simplifies server-side token handling. This managed feature:

  • Automatically captures and stores OAuth tokens from supported identity providers (e.g., Microsoft Entra ID) after successful login.
  • Transparently refreshes access tokens* using refresh tokens, if the identity provider and flow support issuing refresh tokens (commonly with the Authorization Code flow).
  • Secures token storage using Azure’s platform-level encryption and isolation, tokens are never exposed to the browser or client-side code.
  • Provides programmatic token access through the /.auth/me and /.auth/refresh endpoints.

*Refresh Token Case – The Hidden Complexity

The idea of “automatic refresh” in Easy Auth sounds simple, but in practice:

Not all identity providers issue refresh tokens – some flows (like Implicit Flow) skip them entirely.

Refresh token handling depends on session persistence – in stateless, containerized, or on-premises setups, tokens may be lost between app restarts if the token store is unstable.

/.auth/refresh isn’t a valid manual override – it’s controlled by Azure internals, not a guaranteed API that you can call at any time, especially from SPA or mobile apps.

Result? In environments such as containerized apps or self-healing deployments, users may unexpectedly get logged out if tokens aren’t persisted adequately behind the scenes.

Limitations and Trade-offs

Easy Auth offers security and implementation benefits, but has notable limitations. It limits client-side control, such as custom token refresh timings and token validation. It restricts access to raw token claims, affecting compatibility with third-party libraries that expect Bearer tokens. Additionally, its Azure-specific implementation creates vendor dependency, complicating multi-cloud migrations and customization of authentication flows. Some legacy systems require direct Bearer token access, including legacy APIs, traditional JWT integrations, existing mobile app authentications, and microservices needing token propagation. Developers may need to adopt hybrid approaches or alternative authentication methods for these scenarios.

Conclusion

Azure Easy Auth transforms SPA security by emphasizing token isolation over accessibility. It secures authentication secrets on the backend, reducing the risk of token theft and simplifying implementation. Key benefits include complete XSS protection for tokens, automatic token management, and platform-level encryption, all with minimal cost and maintenance.

However, there are trade-offs regarding flexibility and platform independence. Organizations should carefully assess their authentication needs to meet both current and future demands. For enterprise SPAs that prioritize security and rapid development, Easy Auth strikes a strong balance of protection, convenience, and cost-effectiveness, keeping authentication credentials safe from client-side threats.

I spent some time exploring the possibilities of overcoming Easy Auth’s anti-CSRF measures – to hack them and learn how to prevent such a scenario. I will cover this topic in the following article.

Custom Domain Resolution over a Azure Private Endpoint

When you pair an Azure App Service with a Private Endpoint, your goal is simple: internal clients should resolve yourcompany.com to the Private Endpoint’s IPv4 address, never the public one. In my recent deployment, a temporary A record in the public zone was created only for domain‑ownership validation and deleted immediately after. The authoritative record lives exclusively in your internal DNS zone, giving you actual split‑horizon resolution. The sections below illustrate how that flow works and where it can go astray.

Author’s note
This article originates from two pull requests I recently submitted to Microsoft’s Azure documentation to clarify Private Endpoint configuration and its limitations PR #126574 and a follow-up PR #126580. The material captures nuances that, in practice, remain less than obvious.


1. Definitions

Term Meaning
Public 
DNS
The outward-facing DNS infrastructure reachable by the entire Internet. Records reside with your registrar or public DNS provider.
Private 
DNS
A DNS zone whose visibility is limited to your internal network (for example, Azure Private DNS).
It enables split-horizon resolution.
A record Maps a hostname directly to an IPv4 address. Simple, but brittle when the target IP is dynamic.
TXT record Stores free-form text used for domain validation (e.g., Azure, Google), SPF, DKIM, and other metadata. It does not affect name resolution.
Domain
Validation
A one-time procedure in which you add a temporary A or TXT record to prove ownership of the domain to Azure (or another provider). After verification, the record can be safely removed from public DNS.
Split-horizon DNS A setup in which the same domain name resolves to different records depending on whether the query originates inside or outside the network, allowing you to expose public records externally while serving private records internally.
Split-horizon record A DNS record that exists only in the internal zone (or differs internally) so that internal clients resolve a private endpoint while external clients receive no record or a different public record.

2. Domain Name Resolution Journey

Step Action
1. Client query A device inside your VNet (or a peered network) asks:
“Where is www.yourcompany.com ?”
2. Split-horizont record Public DNS now returns no record (NXDOMAIN) because the verification A record was removed. Your internal DNS zone hosts the record instead, either a CNAME pointing to
<app-name>.azurewebsites.net or an A record for the Private Endpoint’s IP.
3. Public to Private alias Azure’s internal resolver automatically rewrites
<app-name>.azurewebsites.net to
<app-name>.privatelink.azurewebsites.net
.
4. Private DNS lookup Because your VNet is linked to the privatelink.azurewebsites.net Private DNS zone, the resolver answers with the Private Endpoint’s IP.
5. TLS connection The client opens an encrypted session directly to the App Service over the private IP.

3. A vs CNAME

Why is an internal A record fragile?

  • Private Endpoint IP addresses can change during scaling, platform maintenance, or redeployment.
  • Updating an A record is manual; stale DNS can cause HTTP 404 TLS handshake failures.
  • Certificates are still validated by hostname, but the connection cannot be made once the IP drifts.

Preferred approach: internal CNAME

  1. In your internal DNS zone, create a CNAME:
    www.yourcompany.com to <app-name>.azurewebsites.net
  2. Ensure the VNet is linked to the privatelink.azurewebsites.net zone so that the alias resolves privately.
  3. Future IP changes are absorbed by Azure; no operator action is required.

4. Common Misconfigurations

Misstep Result Correction
Publishing an A record to the Private Endpoint IP IP changes silently; clients break. Use an internal CNAME; let Azure track the IP lifecycle automatically.
Forgetting to link the Private DNS zone to all VNets Some subnets fall back to public DNS, defeating isolation. Establish VNet links, or use DNS forwarding.
Allowing external resolvers to answer internal names Traffic exits and re-enters the network, complicating firewall rules. Ensure split-horizon DNS: internal queries are resolved internally.

5. Unique Default Hostnames

Since November 2024, Azure App Service allows you to opt in to secure unique default hostnames. A newly created web app receives a randomly‑hashed, region‑scoped address such as:

<app>-a6gqaeashthkhkeu.eastus-01.azurewebsites.net

Why did Microsoft introduce the change?

Microsoft explicitly states that the feature mitigates sub‑domain takeover caused by dangling DNS records and prevents accidental name collisions. Key references:

Impact on the Private Endpoint pattern

The DNS chain itself is unchanged; only the middle CNAME grows longer:

www.yourcompany.com  ->  <app>-hash.region.azurewebsites.net
                                              <app>-hash.region.privatelink.azurewebsites.net  -> 10.x.x.x
  • No additional Private DNS zones are required- continue linking privatelink.azurewebsites.net to your VNets; Azure auto‑populates the A record that maps to the Private Endpoint.
  • Split‑horizon guidance remains the same – keep the public zone empty, and create or retain an internal CNAME so any future IP rotation is invisible to consumers.
  • Automation & monitoring – update scripts or probes that are hard‑coded with the shorter <app>.azurewebsites.net pattern.

Enable the feature for green‑field apps whenever possible; it strengthens the DNS chain your Private Endpoint relies on with zero extra runtime configuration.


6. Frequently Annoying Questions

Does the Private Endpoint operate as a load balancer?

Not directly. Think of it as a sealed door: traffic passes through Azure’s managed App Service fabric, where Microsoft’s load balancers handle distribution. You gain private access and built‑in redundancy without maintaining a separate LB resource.

Why is the custom domain resolved even when I never added it to my private DNS?

Considering the CNAME approach, CNAME ends at privatelink.azurewebsites.net, and that zone is in your Private DNS setup. Therefore, the domain’s final resolution inherits the private mapping automatically – no duplicate records are needed.
While going with an A record… This means the custom domain was added to your private DNS at some point ;).


Closing Thought

DNS underpins connectivity and can be unforgiving. Treat the Private Endpoint as your application’s insurance number: keep it private, and verify twice before moving on. That extra diligence prevents the 2 a.m. incident call, arguably the most persuasive metric.

How to convice Github Action to talk with Azure KeyVault ?

Our CI/CD Journey: From Frustration to Contribution

In our quest to implement CI/CD operations for our Booker project, we aimed to integrate GitHub Actions with Azure Key Vault. It wasn’t a walk in the park. The official documentation lacked a comprehensive, end-to-end use case, leaving us piecing together information from various sources.

Recognizing this gap, I decided to give back to the community, contributing with a pull request to the Azure documentation to help others navigate this integration more smoothly. You can check out this contribution here: Azure Dev Docs PR #1434.In the process, we also discovered several insightful blogs that guided us:

These resources were invaluable in bridging the documentation gaps and providing practical insights.

Stop Stuffing Secrets in Your GitHub Mattress – Azure Key Vault is Here!

Let’s get real: keeping sensitive stuff (API keys, passwords, detailed info about your newest office crush) in your code is like hiding your house keys under the welcome mat; someone eventually looks there, and it’s never good news. GitHub Actions workflows littered with credentials? It’s practically begging for trouble.

Azure Key Vault is your digital Fort Knox. Integrating it with GitHub Actions is like hiring a tiny, overly paranoid robot assistant who hands over secrets strictly on a need-to-know basis. Here’s why you should care:

  • Security: Secrets stay locked up tight, not sprinkled like candy in your code.
  • Zero Fuss: Automation fetches your secrets neatly, eliminating errors and downtime during manual secret rotation
  • Compliance Heaven: Audit trails and granular access controls make security auditors smile.

How GitHub Actions Gets Its Hands on Your Secrets

You’ve got two paths:

1. OpenID Connect (OIDC): Password-Free Magic

  • What It Is: Think of it as your workflow flashing a temporary VIP pass. GitHub Actions authenticates with Azure without long-lived passwords.
  • Why It’s Awesome: No permanent credentials. Less risk, more security. No password rotations.
  • Catch: Short-lived (around 1 hour), particular permissions are needed, so there are no wildcard shortcuts; you can use them only with explicitly pointed branches and exclusively for GitHub Actions.

2. Service Principal & Client Secret: The Old-School Method

  • What It Is: A dedicated Azure identity with a password stored securely in GitHub Secrets.
  • Why It’s Meh: It works, sure, but you’re stuck regularly rotating passwords. It’s the digital equivalent of frequently replacing your doormat- annoying, risky, and may deter your guest from stepping in.

Plugging Security Holes

  • Least Privilege or Bust: Grant only the bare minimum access required. Your bot shouldn’t get keys to the entire house when it just needs the cookie jar.
  • Tighten OIDC Scope: Be hyper-specific about which workflows or branches get access.
  • Network Firewall Rules: Don’t leave the Key Vault wide open. Limit access to GitHub Actions’ known IP addresses.
  • Mask Your Secrets: When fetching secrets, use echo “::add-mask::$SECRET_VALUE” to avoid shouting them to the logs.
  • GitHub Environment Protection: Force manual approval for workflows touching sensitive environments like production. Think club bouncer, but nerdier.
  • Audit Properly: Check Azure Key Vault logs. You’ll know exactly who’s been digging around in there.

Implementation ( OIDC )

Step 1: Configure Federated Identity

  1. Sign in to Azure:
    az login
  2. Set your subscription:
    az account set --subscription <SUBSCRIPTION_ID>
  3. Create a Service Principal:
    Ensure you have the necessary permissions in Azure AD.
    Replace with the desired Application (client) ID for your new or existing Service Principal.
    Note: The original command assumes an existing Azure AD Application registration. If creating a new one, use az ad app create first.
    az ad sp create --id
  4. Create a Federated Credential:
    This links the Service Principal to your GitHub repository branch.
    Adjust ref:refs/heads/main if using a different branch or tag.

    az ad app federated-credential create --id --parameters '{
    "name": "github-oidc",
    "issuer": "https://token.actions.githubusercontent.com",
    "subject": "repo:/:ref:refs/heads/main",
    "audiences": ["api://AzureADTokenExchange"]
    }'

  5. Grant Key Vault Access:
    Assign permissions for the Service Principal to access secrets in your KeyVault.
    The ‘get’ and ‘list’ permissions are typically sufficient.
    az keyvault set-policy --name --spn --secret-permissions get list

Step 2. Workflow

name: Securely Access Azure Key Vault Secret

on:
  push:
    branches: [ main ] # Define specific branches/triggers

# Required permissions for OIDC authentication
permissions:
  id-token: write # Allows workflow to request OIDC token
  contents: read  # Standard permission for checkout

jobs:
  retrieve-secret:
    runs-on: ubuntu-latest
    # Optionally specify environment for protection rules:
    # environment: production

    steps:
      - name: Checkout repository
        uses: actions/checkout@v4

      - name: Log in to Azure
        uses: azure/login@v1
        with:
          # Credentials stored as GitHub Actions Secrets
          client-id: ${{ secrets.AZURE_CLIENT_ID }}
          tenant-id: ${{ secrets.AZURE_TENANT_ID }}
          subscription-id: ${{ secrets.AZURE_SUBSCRIPTION_ID }}
          # Omit 'client-secret' for OIDC authentication
          # Include for Service Principal:
          # client-secret: ${{ secrets.AZURE_CLIENT_SECRET }}

      - name: Retrieve Secret from Azure Key Vault
        id: keyvault_secret
        uses: azure/CLI@v1
        with:
          inlineScript: |
            # Replace <SECRET_NAME> with the target secret
            SECRET_VALUE=$(az keyvault secret show --name <SECRET_NAME> --vault-name           
            ${{ secrets.KEYVAULT_NAME }} --query value -o tsv)
            echo "Masking retrieved secret..."
            # Mask secret value in logs
            echo "::add-mask::$SECRET_VALUE"
            # Export secret for subsequent steps
            echo "SECRET_VALUE=$SECRET_VALUE" >> $GITHUB_ENV

      - name: Utilize Retrieved Secret
        run: |
          echo "Secret retrieved. Proceeding with secured operation."
          # Example usage:
          # ./configure_application --api-key "${{ env.SECRET_VALUE }}"

Just don’t forget…

to set your secrets (AZURE_CLIENT_ID, AZURE_TENANT_ID, AZURE_SUBSCRIPTION_ID, and KEYVAULT_NAME) in Settings > Secrets and Variables > Actions.

Early Adopters: Tech Saviors or False Prophets?

In my previous article, I examined the role of early adopters within software development teams, focusing strictly on internal dynamics, innovation, and how their eagerness (or stubbornness) shapes team processes, even driving teammates slightly insane.

Today, let’s zoom out and question their broader influence on the market. Sure, early adopters might spot your app’s killer feature or its embarrassingly obvious bug, but are they genuinely representative or just overly enthusiastic tech junkies leading you down the rabbit hole?

Let’s break down their value, the illusions they create, and why blindly trusting their gospel might be your quickest ticket to irrelevance.

Feedback is Golden and Biased as Hell

Early adopters excel at breaking things. They’re the first to dive into your new tech, joyfully (or maliciously) surfacing bugs, glitches, and user experience horrors you never imagined. It sounds excellent, free testers! But there’s a catch: they’re usually tech-savvy, impatient, and overly enthusiastic about niche features nobody else cares about.

If you listen exclusively to them, you might craft a product perfect for the tech elite, alienating the vast majority of mainstream users who couldn’t care less about the latest shiny API integration. Your challenge: separate their genuine insight from their wishful thinking.

Strategies to Balance Early Adopter Feedback with Mainstream User Needs:

  • Segmented Feedback Analysis: Clearly separate early adopter feedback from general user feedback, analyzing differences to identify gaps between niche interests and broader needs. This is the moment that you can spot an emerging, disruptive market.
  • Weighted Prioritization: Prioritize features based on broader market research alongside early adopter input. Give early adopters’ requests less weight if they don’t align with mainstream usage scenarios.
  • Rapid, Limited Releases (Controlled Experiments): Launch new features first in a closed beta for early adopters. If the broader market shows interest, consider wider deployment. If not, pivot quickly.
  • Quantitative vs. Qualitative Feedback: Review qualitative feedback (opinions) and quantitative usage data. Actual user behavior often reveals more than verbal enthusiasm.
  • Cross-Functional Validation Teams: Build teams combining product managers, UX specialists, and salespeople who collectively assess whether early adopter suggestions make sense for the broader audience.

Early Adopters Validate Your Vision (Or Do They…?)

Launching something new is always risky, and having early adopters embrace your idea feels like a victory. Investors get excited, your boss is thrilled, and you finally have “market validation.”

Except…not really.

Early adopters’ enthusiasm can create a false sense of security. They’ll passionately champion your new gadget-but their excitement alone doesn’t guarantee broader adoption. Just because tech nerds line up to buy doesn’t mean your grandma ever will. Enthusiasm isn’t the same as a sustainable market.

Identifying When Early Adopter Enthusiasm Turns Unrealistic:

  • Overpromise & Under-Deliver Pattern: It’s a red flag when the community repeatedly sets expectations that the product can’t realistically fulfill.
  • Echo-Chamber Effect: Discussions dominated by speculation, hype, or exaggerated claims about what your product could achieve-particularly when disconnected from practical realities.
  • Rapid Escalation of Feature Requests: Sudden, unrealistic growth in the number or complexity of feature demands, significantly when they extend beyond the product’s core mission.
  • Community Frustration Spike: Increased negative feedback or dissatisfaction over slight delays, minor changes, or typical product limitations indicate inflated expectations.
  • Disconnect Between Enthusiasm and Actual Usage: Enthusiasm without corresponding engagement or practical adoption clearly shows unrealistic expectations.

In short, validate early traction carefully or risk becoming another startup cautionary tale.

Trendsetting vs. Churn: The Double-Edged Sword

Early adopters are your product’s best marketers, generating buzz and setting trends effortlessly. Great, right? Sure, until something newer and shinier comes along, they will vanish quicker than your VC funding.

Their constant chase for novelty creates instability. While it’s fantastic that they’re excited to jump aboard, they’re equally eager to jump ship, leaving you wondering why your previously “hot” tech just died overnight.

Enjoy the buzz while it lasts, but never mistake their momentary excitement for true loyalty or longevity.

Community Advocacy: A Blessing and a Curse

Early adopters form passionate communities, spreading your tech faster and cheaper than traditional marketing. This is authentic and powerful. Still, unchecked enthusiasm can create wildly unrealistic expectations.

If your tech doesn’t deliver exactly as advertised by your passionate fans, the backlash is swift and unforgiving. Suddenly, your amazing advocates become your harshest critics.

Signs Early Adopter Community Is Becoming a Liability:

  • Hostility Toward Mainstream Users: When early adopters show disdain or intolerance toward “average” users, alienating broader audiences.
  • Dominance of a Vocal Minority: A small, highly opinionated group controlling conversations or aggressively steering product direction, drowning out more representative voices.
  • Resistance to Product Evolution: When community members vehemently oppose necessary pivots or mainstream-focused changes, hindering strategic agility.
  • Public Backlash or Toxicity: Increasing negativity, conflicts, and controversies spill into public forums or social media, damaging brand perception.
  • Stagnation and Exclusivity: The community becomes an echo chamber, deterring new members and creating an “insider vs. outsider” culture, limiting growth potential.

Set realistic expectations early-transparency is your shield against eventual disappointment.

Embrace, Balance, Lead

Early adopters are neither your enemy nor your ultimate solution. The key to successfully leveraging their influence lies in effective leadership. Embrace their insights while maintaining a critical perspective, balance their enthusiasm with realistic expectations, and treat their feedback as a compass-not a roadmap. Always remain agile and prepared to pivot if early feedback uncovers something unexpected, whether it’s a surprising feature gaining mainstream attention or an unanticipated use case that resonates strongly with a broader audience. Manage your early adopters proactively, keep an open mind, and you will transform their enthusiasm into genuine, sustainable momentum.

Early Adopters in Software Development Team

( You can find podcast audio description at my YT channel)

Experiencing concepts in action is truly transformative. Last week, I witnessed a fascinating dynamic unfold in my mentoring group, which is focused on application development and driven by Early Adopters.

We decided to tackle a project using a .NET MVC boilerplate and intentionally incorporated HTMX, a technology still gaining wider recognition. This combination, along with the classic ASP.NET MVC pattern, Entity Framework (allowing for both in-memory and SQLite database options), HTMX with the Razor engine, and just a touch of JavaScript, provided a genuinely complete full-stack development experience – something I could see fostering a holistic development approach within the group. Furthermore, showcasing their initiative and deeper understanding of security best practices, these Early Adopters even spearheaded the implementation of a robust authorization model, leveraging the built-in power of .NET Core Identity. What followed became a powerful illustration of everything we’ve been discussing, and honestly, solidified for me the critical role of these individuals in any tech endeavor.

Within my group, it was clear who the Early Adopters were. They naturally gravitated towards HTMX, recognizing its potential for streamlining development within the .NET MVC framework. Their understanding of the framework’s architecture and ability to see the potential of new technologies within this context was instrumental in driving the project forward. They weren’t just excited to use it themselves; they became the project’s engine, driving its forward momentum. What impressed me most was their proactive nature. They weren’t content to just code in their own corner. They willingly invested their time mentoring other members, patiently walking them through the nuances of HTMX and our architectural decisions. It wasn’t simply about finishing the project; it was about elevating the skills of everyone involved. Crucially, I realized a significant motivator for these Early Adopters was the ability to develop a working application rapidly. This tech stack enabled us to quickly bring ideas to life, allowing for swift experimentation and validation – a key driver for their enthusiasm.

The communication within the group, spearheaded by these Early Adopters, was exceptional. They fostered an environment of open inquiry and mutual support. No question was too fundamental, and knowledge flowed freely in both directions. I watched as the technical capabilities of the entire mentoring group demonstrably grew. Individuals who initially felt hesitant about HTMX rapidly gained confidence and competence, benefiting directly from these tech-savvy members’ hands-on guidance and patient explanations. The relative simplicity and rapid prototyping capabilities of this tech stack, championed by the Early Adopters, demonstrably lowered the knowledge adoption bar for the mentees. This, in turn, significantly boosted their faith in their abilities and their progress within the project.

Perhaps the most rewarding observation was the emergence of future leaders. Inspired by the initiative and collaborative spirit of the Early Adopters, a new cohort of skillful developers began to rise within the group. They weren’t just learning the technology; they were emulating the leadership qualities they witnessed – the proactiveness, the willingness to mentor, the clear and supportive communication. This was a clear sign of the positive impact of the Early Adopters, and it filled me with hope for the future of our group and our tech mentoring community.

This experience with my mentoring group sharpened my understanding of the importance of Early Adopters. They weren’t just an abstract concept; they were a lived reality that had a tangible impact on my mentees and our project. This experience made me think deeply about the broader implications of Early Adopters in the tech world.


Grandma might also be an early adopter in an unobvious customer segment (ready to leave the world behind). In my next article, You will read more about early adopters in the context of introducing new products to the market. Stay tuned!

I recently submitted two Pull Requests to the Official C# documentation.

Dive into sealed keyword and abstract class constructors.

I recently submitted two Pull Requests to the official C# documentation, and I’m excited to share the story behind them and what I learned in the process. These PRs stemmed directly from exercises on the Exercism.org platform in the C# path, followed by some great discussions in my C# mentoring group. While working through the exercises, I noticed that certain areas in the documentation could benefit from some updates and clarification, so I decided to contribute!

Let’s jump straight into the specifics of my contributions:


PR #1: Clarifying “sealed” for Overridden Methods

My first Pull Request (https://github.com/dotnet/docs/pull/44196) focused on improving the documentation for the sealed keyword, mainly when applied to overridden methods.

During our mentoring session, a question arose about preventing methods from being overridden further down the inheritance chain. We knew about the sealed keyword, but there was some confusion about its limitations, especially regarding methods inherited from the Object class, like ToString().

Here’s the key takeaway I clarified in the documentation:

You can use sealed to prevent further overriding of methods that your class has overridden from a base class, including fundamental methods like ToString(), GetHashCode(), and Equals() that are inherited from the Object class.

Why is this a big deal?

Every class in C# ultimately inherits from Object. This means they all get methods like ToString(). I discovered that you can seal overrides of methods inherited from the Object class in your class! Here is the sample from my Pull Request:

public class Animal
{
    public virtual string ToString() => "I'm an animal";
}

public class Dog : Animal
{
    public sealed override string ToString() => "I'm a dog";
}

public class Beagle : Dog
{
    // This will cause a compiler error!
    // public override string ToString() => "I'm a beagle"; 
}

This provides much finer control over method behavior in class hierarchies.


PR #2: Demystifying Constructors in Abstract Classes

My second Pull Request (https://github.com/dotnet/docs/pull/44223) delved into the sometimes confusing world of constructors in abstract classes.

Our mentoring group discussed abstract classes’ roles, and we realized the documentation regarding constructors could be more apparent.

Here’s what I aimed to clarify:

Even though you can’t directly create instances of an abstract class (they’re like templates), they can still have constructors! And what’s more, those constructors are often protected.

Why have a constructor in an abstract class?

It’s all about initialization. The protected constructor of an abstract class can be used to set up common properties or perform initial actions that all derived classes will need.

The crucial detail about derived classes and constructors:

My PR highlighted that when you define a constructor in an abstract class that takes parameters, derived classes must explicitly call that constructor using : base(). This is because C# does not automatically provide a parameterless constructor when you’ve defined any constructor yourself.

Here’s the example I used in the documentation:

public abstract class Shape
{
    protected string Color { get; set; }

    protected Shape(string color)
    {
        Color = color;
        Console.WriteLine("Shape constructor called");
    }

    public abstract double GetArea();
}

public class Square : Shape
{
    private double Side { get; set; }

    public Square(string color, double side) : base(color)
    {
        Side = side;
        Console.WriteLine("Square constructor called");
    }

    public override double GetArea() => Side * Side;
}

In this example, Square must call the Shape constructor using : base(color).

Default Parameter Values:

I also emphasized that even if you provide default values for the parameters in your abstract class constructor (e.g., protected Shape(string color = “red”)), that constructor will still be invoked when a derived class object is created, even if the call to base() is omitted. In this case, the default values will be used. This behavior ensures consistent initialization, even if the derived class doesn’t explicitly pass arguments to the base constructor.

Conclusion

These two Pull Requests, born from discussions in my C# mentoring group, helped solidify my understanding of sealed and abstract class constructors. I hope that by sharing these insights, especially the nuances about sealing overridden methods from Object and the behavior of default parameters in abstract class constructors, I’ve helped you gain a deeper appreciation for these C# features. Contributing to the documentation was a great way to learn, and I encourage everyone to get involved!

As always, feel free to ask questions in the comments! Happy coding!

Why did we started with HTMX ?

I’m always looking for technologies that allow students to quickly create interactive web applications while exposing them to architectural patterns used in real-world, enterprise-level systems. This year, my students and I have been thrilled to discover HTMX, a lightweight JavaScript library that has hit this sweet spot.

What is HTMX, and why is it used in the classroom?
In a nutshell, HTMX allows you to access AJAX, CSS transitions, WebSockets, and more directly in HTML, using attributes, so you can build interactive applications with far less code than with JavaScript frameworks like React or Angular. This simplicity is perfect for teaching – students can make proper functionality quickly without getting bogged down in complex syntax and concepts. We pair HTMX with Razor Pages in .NET for the backend, and students are amazed at how fast they can create working applications.

But beyond just simplicity for beginners, HTMX encourages some best practices that are very relevant for enterprise development.


Risk management when introducing new tech.
HTMX is not a vast framework or architecture you are locked into. It works with your existing HTML and server-side code, incrementally adding interactive features. If you later adopt a different front-end approach, migrating an HTMX app is far easier than migrating a heavyweight SPA.

Managing complexity and “unknown unknowns”.
Keeping most of the logic on the server and avoiding building a complex JavaScript front-end reduce the surface area for bugs and unpredictable behavior. Testing is also more straightforward. Things tend to fail in more evident and recoverable ways.

The importance of early adopters.
As a less well-known technology, finding experienced HTMX developers may be challenging. However, HTMX is easy to learn, especially for developers who are already proficient in HTML and a backend language. Students learning it now will be the early adopters ready to apply it in companies later.

Focus on user needs (jobs to be done).
HTMX’s attributes map well to user interface needs – things like “update this area when this button is clicked” or “toggle this section when this checkbox changes”. Students think in terms of the user interaction first, not framework mechanics.


So what’s the value in teaching with a niche tool like HTMX?
First, students get to build real things faster, which is highly motivating. But even more importantly, they gently absorb functional patterns – separation of concerns, progressive enhancement, and declarative vs imperative coding. The niche tool provides a more gradual ladder for professional web development proficiency.

For my classes, we continue to expand what we build with HTMX and Razor Pages. I encourage other educators and companies investing in early-career talent to give HTMX a serious look. It beautifully balances simplicity for beginners with concepts that scale to the enterprise.

Booker – how it started, where is going ?

Since 2021, I have mentored young adults – “high-school+” students.
My entire professional career is related to the Microsoft ecosystem, so I’m offering these young people my knowledge of .net + Azure, together with my leadership and business experience.

Pictures have been captured in the Fujitsu office over the past two years.
This is our second ‘Christmas Eve’. We meet every week during the school year- in the office or on the dedicated Discord server I run. Our team has changed slightly, but we are still growing together. We have finished learning C# programming on the Exercism platform and have moved on to project work. There is a yearly book fair at the Silesian Technical University, and the guys came up with the idea that the fair has the potential to undergo a digital transformation – from a “garage sale” to one based on an application that facilitates the search for textbooks and the linking of transaction sides-buyers with sellers. So we are writing such an application using .Net, Razor Engine + Htmx, Pico.css, and Sql Server. We plan to make a CI/CD on GitHub and select Azure Infrastructure as our hosting environment. The project called Booker can be found here.

What’s the deadline? From what I remember, it’s September. What will we learn from this implementation? Check this blog; I’ll keep you in the loop!